Engine Rebuild 5: Summary.
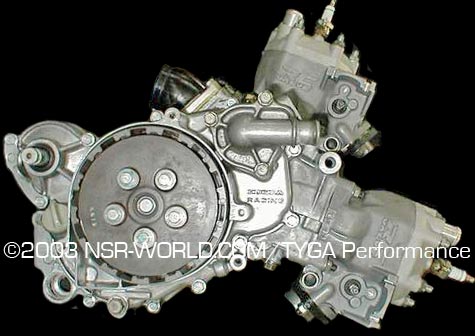
With the motor reassembled there are a few things to consider before it is first run.
If the motor has been rebuilt because components have simply reached their service limit, then hook the various control cables and feed pipes up and prepare the motor for running. If however, there was a more sinister reason for engine failure, the cause of the failure MUST be determined before restarting the engine.The majority of 2-stroke engine failures can be traced to one thing - poor lubrication. Whether it's an oil pump failure, a fuel system failure, or poor jetting, it's the low concentration of oil, and hence poor lubrication, that causes rapid wear and ultimately failure.
We highly recommend stripping and cleaning the carb's before running a fresh motor. If a jet (particularly a Power Jet, as they are very small) has become blocked, this may not be detected on initial start-up.
If the motor is to be run with the oil injection system, the system needs to be inspected and adjusted prior to running the motor. Adjustment details can be found in the Technical Index. If the 2-stroke oil tank has been disconnected then the pump will need bleeding.
Ensure the 2-stroke oil reservoir is fully topped up, and the main feed hose to the injector pump connected securely. Completely remove the bleed screw and watch for air bubbles in the oil coming from the hole. When no more air bubbles are visible, replace the screw. It is advisable to also bleed the feed pipes to the inlet manifolds. There are two ways to do this - manually or with the engine running. To manually bleed the feed pipes the oil pump needs to be removed from the engine case.
Best results are obtained by clearing the feed pipes of all oil by rinsing them through with a blast of carb cleaner; this will help prevent a false indication of flow from previous oil in the pipes. Disconnect the feed pipes from the inlet manifolds and the pump, place a piece of cloth over the end of each pipe before you spray through them with the carb cleaner. Connect the feed pipes back to the pump (leaving the manifold ends unconnected) then simply turn the pump shaft until oil drips from the end of the feed pipes! Replace the oil pump and reconnect the feed pipes to the inlet manifolds.
Alternatively, it is possible to bleed the pump automatically. If you are confident there has been no disruption to the main oil pipe leading to the pump, and only the feed pipes to the manifolds require bleeding, then simply connect them up ready for when you run the motor. The oil used during the engine rebuild will provide sufficient extra lubrication upon start-up while any excess air passes out of the pipes. When the motor is started for the first time, manually open the pump pulley to maximum for approximately 10 seconds to help promote oil flow.
One final method, also automatic, can be used to bleed the system. This entails initially running the motor on 30:1 pre-mix for the first few minutes. Either remove the fuel tank and hook up a temporary feed bottle (something similar to that often used on a dyno) or drain the tank and fill it with a litre of 30:1 pre-mix. Disconnect the feed pipes from the inlet manifolds and blank off the manifold nozzles to prevent excess air being drawn into the crankcase. When the motor is started, manually open the pump pulley to maximum until you see a constant flow of oil (and no air bubbles) from the ends of the feed pipes. When you are satisfied there is no more air in the system, reconnect the feed pipes to the manifolds and swap back to "normal" fuel.
| NOTE: | For both the "automatic" methods described, if the motor is being run for the first time after a rebuild, it is important that the engine is allowed to reach normal operating temperature before it is shut down. |
Double check the coolant hoses and the coolant level. ![]() uses and recommends Rock Oil pre-mixed coolant for use in the NSR cooling system. This comes "ready-to-use" in 1 litre bottles; simply pour into the system, bleed out the excess air, and fasten the radiator cap!
uses and recommends Rock Oil pre-mixed coolant for use in the NSR cooling system. This comes "ready-to-use" in 1 litre bottles; simply pour into the system, bleed out the excess air, and fasten the radiator cap!
Finally, check all the electrical connections. Ensure the T.P.S. is securely connected, and the oil pump solenoid plug is reconnected if necessary.
Starting the engine:
Unlike 4-stroke engines, the main components in the NSR engine (crank, con-rods, and pistons) all run on "needle" or "roller" bearings or "ball races". This means there is little or no "running-in" required after assembly. In fact, the only "running-in" that needs to be done, is to the piston rings. The NSR piston rings have a teflon style coating on their outer edge to aid lubrication on initial start-up after their first installation. Once these are bedded in, the motor is once again free to rev to its' limit!
The safest way to bed in the new components is to perform a series of "heat cycles". Our recommended procedure is as follows:
| 1. | Start the motor on a paddock stand. constantly vary the throttle, but keep the revs below 5000rpm. Allow it to run up to normal operating temperature which will take a few minutes. Once at operating temperature, vary the revs between 5000 and 7000rpm for a further 5 minutes. |
| 2. | Stop the motor and allow it to cool fully. Allow at least 30 minutes for cooling down, but 1 hour is more desirable. |
| After the first heat cycle, check all the coolant hoses for leaks, and the coolant level in the expansion bottle and radiator is at the correct level. | |
| 3. | Restart the motor, and ride the bike. Allow the motor to rev freely up to around 8000rpm but do not "labour" it, i.e. low rpm/wide throttle openings. Ride the bike for 15 minutes + warm-up time - probably 20 minutes in total. |
| 4. | Stop the motor and allow it to cool fully. |
| 5. | Again, run the motor to operating temperature. While riding the bike, allow the motor to rev freely to 10,000rpm, but again, use only small (less than half) throttle openings. Another 20 minute session should be more than adequate. |
| 6. | Stop the motor and allow it to cool fully. |
Successfully carry out these three heat cycles, and you should feel confident enough to take the bike out and use it as Honda intended!
Congratulations! You've completed your engine overhaul!
![]()
