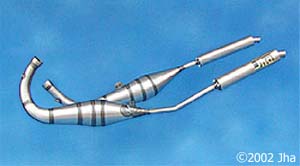
The
exhaust system is usually the first major item on
any owners shopping list. Purely on aesthetics alone,
shiny new expansion chambers rank as the number one
upgrade! Just their presence is bound to invoke the
"What else have you done to it mate?" and
"How fast does it go now?" type questions
from onlookers!
It is
impractical to tune any aspect of the standard exhaust
system, so a complete replacement system is required,
or if your finances won't allow, at least a pair of
less restrictive end cans. High quality end cans in
the UK can be bought from Swarbrick Racing in either
carbon fibre or alloy, priced at £127 and £66 a pair
+ shipping respectively. Swarbrick Racing can
be contacted on 01995 640291 and are in Lancashire.
Choosing
the parts.
First decide on how
much performance you require, if you are just looking
for a modest increase in speed, a basic speed delimiter
and a pair of end cans will be more than adequate.
However, if you are trying to extract the last 1/1000%
performance out of your bike you will want a system
such as the titanium Ethos one below.
The benefit
of a titanium system over the more common stainless
steel (SS) systems is purely a weight saving. Unless
you are out to build the ultimate 250cc "proddy"
racer or have just won "Who wants to be a millionaire?"
I don't think the cost can be justified as it is more
than double that of the SS system.
The next
available choice is design. Most manufacturers market
a range of designs, each having a different power
characteristic. One popular design is the NSR500 style
where both chambers exit from under the Gull-Arm.
Although looking highly attractive, this is the least
efficient system due to the physical shape of the
expansion chambers. The best design, performance wise,
is any system following the stock layout.
Although
each system can look very similar in design, each
will require the jetting optimised to suit it, so
in swapping pipes, say from Jha's 500V to their SP
type or vice versa, don't be surprised if you don't
immediately get the results you expected!
Fitting
the system.
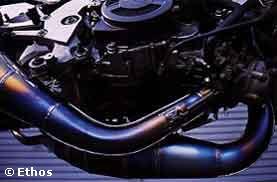
Most aftermarket
systems now come with separate manifolds and spring
clips to hold the various sections together. Bear
this in mind if you are modifying your bike in steps,
for example, if you intend to buy end cans only, with
a view to fitting a system at a later date, check
that the system you are buying can be used with your
bolt on cans! Below is a diagram of a typical aftermarket
manifold and its associated components.
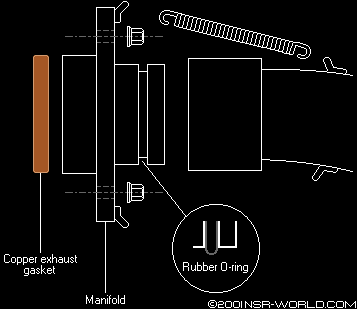
When fitting the new
manifolds always use new gaskets and remember that
the rubber O-rings, if used, will need replacing every
couple of months as they rapidly deteriorate with
the heat generated by the engine and exhaust gases.
Replacement O-rings can be bought from any good hydraulic
hose specialist at a fraction of the cost rather than
going to the exhaust manufacturer, check in the Yellow
pages for a list of local suppliers. Pirtek in the
UK supply excellent replacements for only a fraction
of the cost of the OEM parts!
Benefits of spring clips
holding the sections together are ease of assembly
and disassembly, and that GP style look! The chambers
are also easily removed for periodically checking
the RC Valve adjustment. The down side is that the
clips are notorious for "buzzing" when the
motor is revved, and that they can quite often mysteriously
disappear overnight!!
Aftermarket motocross
systems use spring clips to hold them on so a visit
to your local MX shop will be the order of the day
soon after you've acquired your new system. Apico
make a very good cheaper alternative to the supplied
springs (part# spring 90mm!)
and as they are mild steel instead of stainless steel,
can be both fitted (stretched) more easily and have
their ends crimped to help prevent themselves working
loose again. Since using these springs on my manifolds
I have yet to loose one!
HRC
systems come complete with rubber shields similar
to that on the side stand (kickstand) spring to stop
the aforementioned "buzzing", a good alternative
is a length of heatshrink on each spring or simply
a short length of electrical tape wound around them,
although the heatshrink is definitely tidier and will
last longer! Another good tip is to lockwire the sections
together. This provides added security just in case
those springs do work loose 100 miles away from home!
(It also stops some bright spark running off with
your end cans when you're not looking!)
One
problem you may encounter with some systems is that
they will not clear the original bodywork. As they
are optimised for performance their design sometimes
means that there just isn't sufficient room to squeeze
the chambers into the required space! If you have
opted for a full performance system rather than one
that's simply more pleasing to the eye, this is something
you'll just have to live with, but will probably only
require the slightest of trimming.
Some
expansion chambers, the Ethos SP Over-rev's
for example, require the radiator moving forward approximately
10mm (easily done by simply bending the lower mounting
bracket or by fitting 2 longer studs into the barrel
and adding two 10mm spacers) and the plastic radiator
shroud trimming a little. The fairing lowers can also
touch the chambers and thus may need a little trimming.
A small 60mm x 25mm x3mm alloy plate can be fabricated
to hold the two lower fairing sections together at
the rear as the standard plate will no longer
fit with fatter pipes. A simple fix would be a couple
of holes drilled in the underside and a couple of
cable ties used to fix the 2 halves together!
For the performance gain, this small amount of work
is well worth the effort!
Original
product images reproduced by kind permission of Jha
and Ethos.


